Monday, 19 December 2011

Small ring, Big ring: Tortellini,Tortelloni

Made by Raffaella with the contribution of Megan, Melanie and Za.


Originated from Italy, this ring-shaped pasta is absolutely delectable and savory. It is usually served with sauce or in a broth. 
*drooling* 
Tortelloni are bigger and generally stuffed with veggies. 


Parmesan cheese and Mortadella 
The filling
A portion of Turkey bacon! and another of Mortadella (this brilliant idea was the brainchild of Raffaella's long mulling over. Another option was cheese and spinach.
So, here's the deal: 
Stir fry the shredded turkey bacon and chopped mortadella together for a minute or two.
In a blender or a food processor put the mixture. Add 2 table spoons of Mascarpone cheese or any creamy cheese you like, and blend. Add the diced Parmesan, blend more, till you get this gorgeous burnt-pink-coloured paste (gloop lol) 
If it's too runny, add a bit of bread crumbs, till it gets slightly thicker. (see picture


Tortellini filling
The pasta 
Now, in order to get this beautifully shaped tortellini,


Make sure to follow these steps in the order indicated bellow: 


On your working counter, put 400g of flour and make a hole in the centre for 4 eggs and a pinch of salt. 
Incorporate the ingredients to create a non-sticky dough. 
Knead it as much as you can to soften it. If it's too hard and dry add few drops of milk/water 
On a surface dusted with flour, roll the dough flat after letting it rest for a few minutes. ( 10-15) 
Make squares 

Click here to see a video from youtube for ideas on how to fold and wrap your pasta :) 

Melanie engrossed in ring-shaping the pasta

You can also play with making round shaped Tortellini :-D 


Knock yourself out! make as many as you want. 

Then, chuck the first batch in -slightly salted- boiled water (adding a tbsp of oil helps the pasta not stick


The tortellini you get at the shop cook quiet rapidly, once you toss them in boiling water, allow them 2 to 3 minutes and you'll see them floating to the surface. That means they're ready. 
However, we let ours cook a bit longer (5 to 7 mins) as the dough was homemade and not thin enough. We used a roller pin to roll the dough 0.5mm thick, but it would have been a whole lot easier and way much better to use a pasta roller (click) ... (which we didn't have hehe :-p )
The pasta was super yummy with white Alfredo sauce


Bsahetkom - Enjoy- Bon appetit 


Sunday, 18 December 2011

Croquet: Crunchy Breakfast

By Za,  


Croquet is very popular in Algies, lots of people love it. Women and bakeries make it almost regularly for breakfast or afternoon coffee/tea.. 
It goes fantastically well with 'coffee with milk' in the morning. quiet filling.

It looks a bit like Biscotti but they are not bread. They belong to the 'cake' family. 


Ingredients: 


  • 1 yogurt pot of eggs (I used 2 eggs) ( you can use a bowl, a cup, a glass of water, a mug or a yogurt pot just like what I used today.)
  • 1 yogurt pot of sugar (I used the same yogurt pot for measuring most of these ingredients) 
  • 1 yogurt pot of oil
  • 1 tsp of vanilla
  • 1/2 sachet of baking powder. 
  • 1 tsp of lemon zest
  • Flour (just add till the dough's no longer sticky but far from being hard.) 

This is the result 

In a big bowl,


Put the eggs and sugar and mix well. 
Add the oil and mix more. 
Add the vanella, baking powder and lemon zest and mix. 
Now start adding the flour bit by bit till you have an extremely soft and non-sticky dough. 
Dust your tray with flour and flatten your dough a little bit length-ways (lengthwise). (see picture= 2 to 2.5cm/=1 inch high

Glaze with egg yolks (I only used one and I don't add any milk to it in order to get a mahogany golden shire glaze, But you could thin down the egg yold by adding a tiny bit of milk.You could also add a tea spoon of coffee) use a brush to coat your dough first then a fork to lightly scratch the surface forming multiple parallel rail-like looking lines. ( see picture


Chuck it in your preheated oven (I put it on 150C

Take it out when it's doubled in size and the glaze's gone golden ( I leave it baking 15- 20mins)

 cut it width-wise  
Leave it to cool 


It should be dry and breaks easily into crumbs/ crispy.


Bsahatkom - Enjoy - Bon appetit 


Thursday, 15 December 2011

Jeljlania (sesame balls)

By Za, 


One of the special delights Eid brings about in Algeria is the joy of making, and most importantly eating several hundreds of diverse kinds of cookies, sweets, cakes and patisseries. Most families would make a roughly average of 7 to 10 kinds of cookies. These are offered to other family members, guests, friends and neighbours. My highest record of cookie making has always been 4 (attained last year). This year, though, I only got around to making two varieties of which I'd like to share one today. 


I got to know this recipe thanks to mum. The first time I got introduced to the Jeljlania, I knew straight away  it was  'love at first sight'. My feelings were intensely confirmed when I tasted it. Everything about me melted then. (well, I also kind of got badly told off after a few minutes when mum found out I had hoovered up all the rest of the Jeljlania stashed in the cupboard. I got ball chained away it them every time I'd come within a reaching distance.


So if you don't know what I'm talking about, let me shed some light into your gastronomic world, by introducing you to this simple yet tasty sesame balls. 


I you're interesting in making it, next time you go to the market, make sure you toss the following ingredients in you shopping basket: 


  • 1kg white Flour
  • Unsalted buter (500g) 
  • 2 cups of icing sugar
  • 1 sachet of baking powder
  • 2 tea spoons of vanilla. 
  • 6 egg whites. 
  • Sesame 
  • Orange floral water. 
  • Medium cake cases
  • Honey 


In your working lab: 


Mix the butter and the icing sugar well, till they form a light-colored cream. 
Add the egg whites, baking powder and vanilla, and mix well.
Pour flour till you gather the dough. don't work or knead it. 
Make a few small balls from the batch. 
In a preheated pan, put the sesame and grill it by just stirring it over and over continually until they gain a golden brown color. 


Dip the balls in the orange floral water (or egg whites) then roll them around in a bowl full of grilled sesame. 
Place them in the cake cases and chuck them in the preheated oven (I put it on 150C). 
Check on them from time to time. 
PS: do not open the oven until after 20mins of baking. they'll puff up and double in size. 
Get them out when they are cooked (I always sacrifice one by digging the tip of a knife in it to check
make sure you've put your honey (add a tiny bit of water to it) in a cassrole to bring it to a boil, so that, when you get your cookies out, you spoon water them with that boiling honey. 
They'll absorb it all and become more tender as a result. 


Let cool and enjoy. 


Bsahatkom. 
Coming soon, in-sha'a-llah Eid mini fruit tarts 


Thursday, 8 December 2011

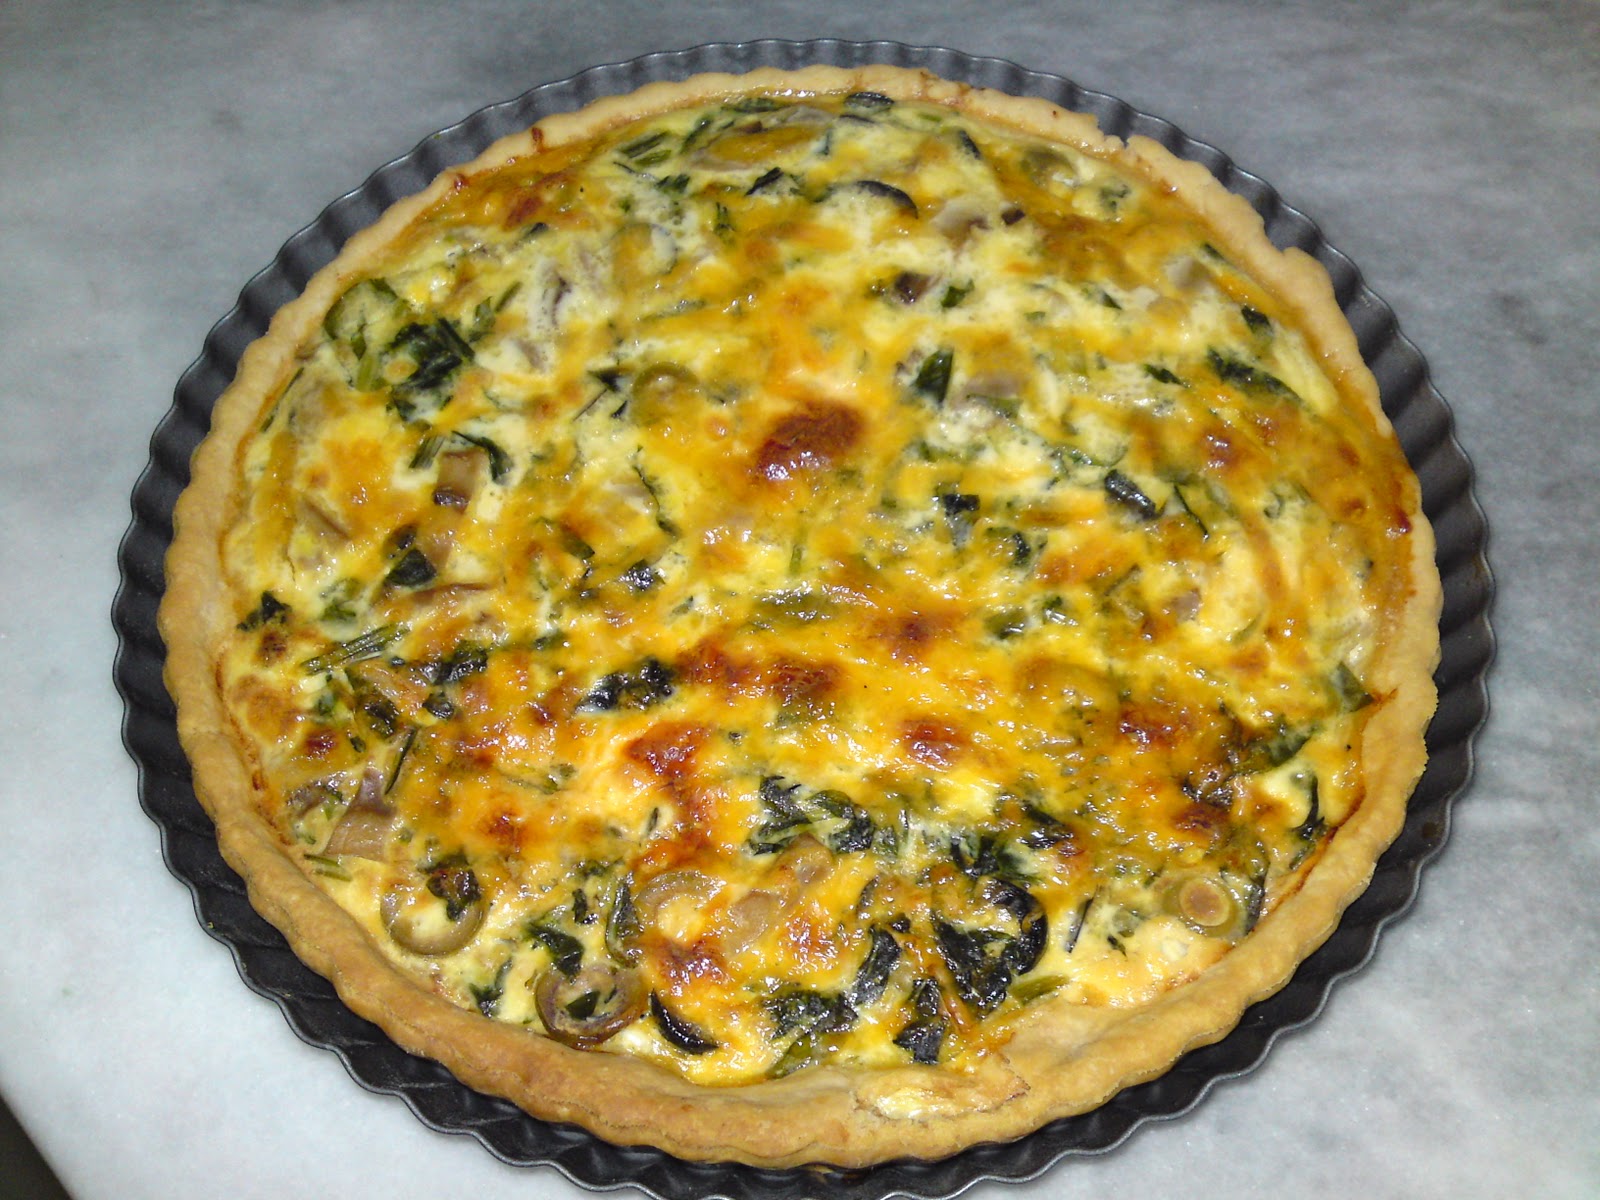
Quiche for the love of winter


By Za 


Wherever you are, winter knocks on your door. So, if you're hosting it tonight, then, I'd like to suggest this simple yet delicious quiche to offer to your freezing guest. :) 


Ingredients: 


For the crust: 

  • Flour (1 and 1/2 British mug)
  • Veg oil (1/3 British mug. PS: you can also use butter, I'm not sure how much though
  • Yeast (1/2 tea spoon)
  • Salt (a pinch
  • Water (to assemble the dough


Filling:  

  • Milk (1 British mug
  • Black and Green olives (sliced
  • Cheese (I used La vache qui rit and red grated Cheddar
  • Mushrooms (a handful
  • Spinach (a handful
  • Eggs (I only use two, but 3 or 4 would be better)


Method: 
Preheat the oven (150 to 180C


For the crust: 
Put the flour in a big bowl
Add oil (or butter) and rub it into the flour. It should look like breadcrumbs. 
Add yeast 
Don't forget your salt.
Then Pour in water little by little while you're mixing, till you see the dough gathering and can be hold together. 
Pull it all together in a big ball. 
PS: Do NOT knead it. 
On a (flour) dusted surface, spread and flatten your crust before you lay it on the Quiche mold  . 
Chuck it in the oven to harden and whiten a bit (just HALF cook it)


While you crust is taking shape and color, prepare your filling


Pour milk in a big bowl. 
Add cheese, olives, spinach and eggs
Mix well, get your crust and pour the mixture on it, sprinkle some grated cheese on top and put back in the oven. 


Check on it from time to time till you see it's become hard and gained a golden color. (you can "stab" it with a knife to check in inside, it should look like scrambled eggs


PS: I tend to lay tiny bits of butter on top of the quiche once cooked and before I take it out of the oven. 


The filling


A few seconds before it hit the oven again
Let it cool before you dig in your knife to cut it.
Colours sweet colours  


Cooked, cut and ready 

PS: I had some crust left, not enough to fit in the big mold, so i use it in the smaller ones to make mini quiches 

 mini mini 

Odd one out 


Enjoy - Bsahtkom -
 Bon appetit. 


Wednesday, 7 December 2011

Yummy Easy Banana and Walnut cake

By Reem 


Recipe:
Preheat oven on low heat.

Ingredients:

1 cup of plain flour, 1/2 cup sugar, 1/4 cup oil, 1 large egg or 2 small eggs, 5 table spoons of milk, 1 spoon 5ml of baking soda and 1 spoon 5 ml of baking powder, 4 drops of vanilla, 1 to 2 full spoon of well crushed walnuts and 3 large bananas or 4 tiny ones.

(cup = 175ml)

make sure u preheat the oven before getting out the ingredients.

Mix: flour, sugar, baking soda and powder.
Once they r all mixed well add the oil, egg, vanilla and milk and mix v well again.

In a seperate bowl: Mash the bananas until there r no bits. (the more ripe the better).

Add the mashed bananas to the mixture and again mix really well.

Grease tray with oil.
The layer poured shouldnt be thick.
Middle rack.
Bake on very low heat for an hour. 
Check after 45 mins.


For minis lovers


Ideal with icing, icecream and nutella. 

Enjoy

Sunday, 4 December 2011

Gran's lozenges (Braaj)

By Za, 


Braaj are some date paste sandwiched in a shortbread semolina. I discovered these sweet munchies from my gran. She used to make to welcome and celebrate the coming of Spring. It was a tradition she had kept running for many years. Too bad, it wasn't perpetuated by her children. I decided to make them and keep the tradition as a tribute to her :)
Kids absolutely love Braaj, and so do all Algerians. 


I would like to offer these Algerian traditional baby “date sandwiches” to her, yous lot reader and all date lovers, for the coming season of Spring.

"Note that Algerian traditional recipes measure the volume of ingredients and not their weight. The idea is to take any measure , be it a cup, a glass or a big container , fill it three time with the dry ingredients (semoulina in this case) and one time with fat ( butter, ghee, etc….) the choice of the measure will determine the quantity of the pastry…..if you want a small quantity, choose a small container, and vice-versa" Kaouther 

What you need is: 

  • Semolina – Medium (2 full British mugs measure) - that's what i use for measuring
  • Salt (a pinch) 
  • Ghee+oil ( ½ a British mug measure
  • Orange blossom water diluted in water ( enoughto gather the mixture into a dough)


Stuffing:
  • Date paste (worked) - wet my hands with water to work and flatten it. It makes it less sticky :o) 


The Method:

For the dough, put your semolina in a bowl.
Add salt and ghee and mix very well.
Rub it continually between your palms to make sure the grease is integrated in and fully incorporated with the semolina.
You should have a mixture that feels like wet sand.

Let it rest 15 to 30 minutes.

Meanwhile, work the dates paste. Just knead it a little bit to remove any bits of bones or hard flakes. 

 If you find it sticky or hard, use some oil or water to work it easily or steam it a little to turn it softer.

When you’re done with the paste, to back to your semolina and gather it with some water to get a breaking dough like this. (don't knead it too much) 

Split it into two equal halves. (pic ==>) 


___________________________________ooOoO0OoOoo_________________________________


1- Flatten the first half - 8 milimetres thick.
2- Flatten the dates paste as thin as you want it to be ( 3mm)
3- Lay the flat date paste on the first flattened half of dough and cover it with the second flattened half of dough creating a sandwich as illustrated in the pictures. (4)
give it a last roll with the rolling pin to flatten everything and stick it all together. 


 In the final stage, cut the sandwich however you like. I love lozenge shaped Braaj. That’s how my gran used to cut them. Algerian's are big fans of lozenge/diamond shapes and they shape most of their food/sweets into that.  
But you can make them square, round, triangle, pentagon or star ..have fun  and go crazy with your cookie cutters heh! 


Preheat your pan or tawa and cook them both sides till they gain a red-ish colour.

Eat with milk, curd milk, tea or some coffee.
We tend to eat them for breakfast and afternoon tea/coffee. 


PS: Some people have sensitive stomach. Thus, end up suffering from heart-burns after consuming LOTS of braaj :P .. don't panic, it's normal. Just drink some cold milk - a cup or so, and you should feel better after a couple of seconds :o) 


Bsahatkom- Enjoy - Bon appetit  :)


Saturday, 26 November 2011

Another omelet!

By Youcef


Hello! Here comes another omelet for the lazy people!!! (like me :-P ) 


This one was inspired by Camille's and Reem's idea for recycling chicken leftovers! :-D


Alright, you'll need some... ermm... chicken leftovers! And of course, eggs, and cheese. (I used that kind of cheese used in sandwiches and burgers, you know, the one that's so thin it makes it almost look healthy! hihihi)


Put a frying pan on medium high if you're using an electric stove (medium low for fire/gas), then put just a bit of vegetable oil, just so it won't stick. 


In the meantime, mix up some eggs in a cup (I used 2, depending on how much chicken you're using), chuck in some salt, pepper, or anything of your liking. (No rat poison, don't listen to Aqeel if he tells you to do so)


 Put the chicken leftovers in the pan (those need to be shredded, you can do that by hand, as long as you don't eat every second piece as you do it, you'd be left with nothing I assure you), and spread the pieces evenly. 


Now the cheese, get the cheese, goooooooooo get the cheese! Ok, cut it into medium pieces and spread it on the chicken then pour the mixed eggs onto the whole thing! 


                      You're now ready to.... put the lid on the pan and wait. 


                         About 10 minutes later, it should be ready! (don't trust me, keep an eye on it >:->) 


Here's something to try too... Have a go and eat it with with croissants! Tastes awesome! :-D 

                   Cooked :-D .............. Gone :-D ............... *Burp* :-P